Version: v250815.1
Release Date: 20th August, 2025
Summary
This release includes user stories developed in Sprint 3 and bug fixes. For detail information see change log.
Changelog
Package versions
- Brief Connect Client Package - v2.2.5-rc
- Brief Connect Server Package - v2.2.5-rc
Manual pre-deployment steps
N/A
Deployment steps (in order)
- Deploy Release-25 for Deploy Brief Connect Office Resources release pipeline in Azure DevOps to the target environment.
- Deploy Release-16 for Deploy Brief Connect Application release pipeline in Azure DevOps to the target environment.
Manual post-deployment steps
Steps to Import Configuration
Config file to import: DE-Config_250820_v1-config-13b87ef9-9af1-403d-ac85-d775487c1fe8.zip
- Navigate to the Admin Panel:
- Open the Brief Connect application and go to the Admin Panel (
https://[WEB_APP_URL]/#/adminPanel) -
Ensure you are logged in with administrative privileges. > If there is no configuration set, you have to set up Administrator user Id in the Environment variable
AdminEntraIdin the Azure Function App. The value should be the Object Id of the user in Entra ID (Azure AD). -
Ensure there are no unsaved changes if you intend to modify the currently loaded configuration view (though import typically loads a new one or replaces an existing one).
- Click the "Import from ZIP" button.
- In the dialog:
_ Optionally, select an existing configuration from the "Configuration to Replace" dropdown if you wish to overwrite a specific one.
_ Click "Select File & Import". * Choose the ZIP file from your local machine. - The system will process the ZIP file and import the configuration. The list of configurations will refresh, and the imported configuration can then be selected and loaded.
- After importing, select the newly imported configuration from the dropdown list.
- Click the "Apply" button to apply the imported configuration.
- Wait for the confirmation message indicating that the configuration has been successfully applied.
- Select
Update SharePoint Content Typesbutton from the menu bar. Ensure that active configuration is selected from dropdown first. - The application will now use the newly applied configuration settings.
PDF Pack files to upload
- Download the attached PDF briefing pack files (PDF Packs.zip) and export them
- Go to the related SharePoint site.
- Open 'PDF Pack Templates' library.
- Upload the exported HTML files to this library.
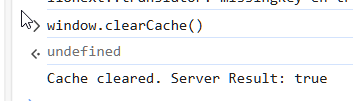
Steps to clear the Server cache
- In the browser console via Developer Tools, run the command
window.clearCache().
Example:
Reindex the site
- Go to SharePoint Site
- Go to Site settings
- Go to Search and offline availability
- Click Reindex site
Rollback steps to previous version
Execute all steps in BC v250815.1 Release Notes
Known Issues
- After creating a record and opening it, you may find you're not able to change the Information Security Classification, or it may incorrectly display as
Official. This is a UI bug which we will be resolving ASAP. - PDF Pack does is not currently displaying the Action Required field value.