Notifications Logic App deployment guide
1. Prerequisites
- Cloud Admin account to create App registrations, grant admin consent
- Azure Subscription (same subscription can be shared across multiple environments, for example non-prod environments can share a single subscription).
- Created Azure resource group, associated with the subscription above.
- User with Owner permissions for the resource group created.
2 Partner Association Link
Partner Association Link As a first step in the deployment and configuration of the solution, we ask that the user(s) responsible for deployment activities associate our Microsoft Partner ID with the solution. You can do so by associating the Microsoft account you are using for the deployment (such as a dedicated service account with Contribute access to the Azure resource groups) with our Partner ID using a Partner Association Link (PAL)
PAL enables Microsoft to identify and recognise partners like Engage Squared who are helping customers achieve business objectives and realise value in the cloud. The PAL association to existing credentials provides no new customer data to Microsoft. It simply provides the information to Microsoft where a partner is actively involved in a customer's Azure environment.
To enable PAL:
- Open this page to link our partner ID: https://portal.azure.com/#view/Microsoft_Azure_Billing/ManagementPartnerBlade
- Login with the account you will use for deployment
- Enter our Partner ID:
5185222
If you are using multiple accounts for the deployment process (or multiple users are involved), please repeat this process for all accounts.
Link to a partner ID | (learn.microsoft.com)
3 Initial Deployment - Create Logic App
Deploy Azure Logic Apps (Standard) with next assumptions:
- Use Azure Logic App (Standard), deployed on the pricing plan on your choice. Scale up the plan tier if throughput or concurrency requirements grow.
- Logic App should be accessible (inbound) from Brief Connect Function Application (network restrictions). Brief Connect emits a webhook per configured workflow event (transition). The webhook carries a minimal payload (e.g., recordId, transitionId).
- Logic App should have outbound access to Brief Connect Web API Web Application. The Logic App use Brief Connect Web API to retrieve full context from Brief Connect about records, users, workflows etc., applies business rules, and performs downstream Brief Connect actions.
- Logic App should have outbound access to Microsoft Graph API endpoints.
- Activate System assigned managed identity for the deployed logic app (Logic App -> Identity -> Under System assigned, toggle On -> Save)
4 Register custom application role WebApi.FullControl
Use Cloud Admin account to register custom application role 'WebApi.FullControl' for Brief Connect Server Application Registration.
Run the next steps:
- Update parameters in the header and run the script in Cloud Shell console.
Parameters:
- briefConnectServerAppObjectId: Object ID obtained from Azure Portal - Microsoft Entra ID - App registrations for Brief Connect Server Application Registration
``powershell
   # ----- PARAMETERS SECTION -----
   $briefConnectServerAppObjectId = ""
   # ----- END PARAMETERS SECTION -----
   $roleName = "Access Brief Connect WebApi with FullControl privileges"
   $roleId = "4ddb4a96-477c-43a3-812d-499449c33f20"
   az rest --method "PATCH" --headers "Content-type=application/json"
--url "https://graph.microsoft.com/v1.0/myorganization/applications/$briefConnectServerAppObjectId" `
--body "{'appRoles':[{'description': '$roleName', 'displayName': '$roleName', 'isEnabled':true, 'id': '$roleId', 'value': 'WebApi.FullControl', 'allowedMemberTypes':['Application']}]}"
```
- Go to Azure Portal - Cloud shell, paste the script and execute it.
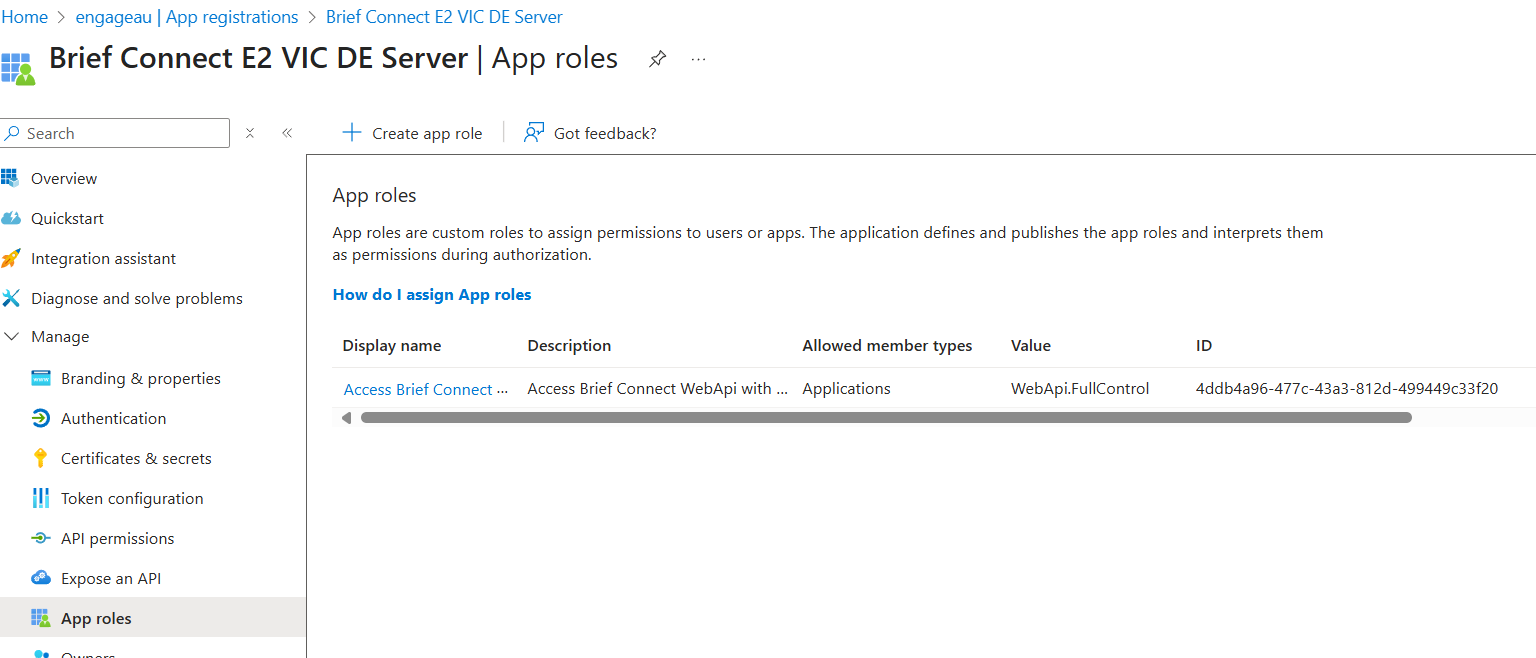
- Validate role
- Go to Azure Portal - Microsoft Entra ID - App registrations
- Find Brief Connect Server Application and open it
- Open App roles page and validate new WebApi.FullControl role is there
5 Grant permissions and admin consent
Use Cloud Admin account to add permissions and grant admin consent for permissions added to Logic App Managed Identity service principal
Run the next steps:
- Update parameters in the header and run the script in Cloud Shell console.
Parameters:
- briefConnectServerSPObjectId: Object ID obtained from Azure Portal - Microsoft Entra ID - Enterprise applications for Brief Connect Server Application service principal
servicePrincipalObjectId: Object ID obtained from Azure Portal - Microsoft Entra ID - Enterprise applications for the logic app managed identity service principal
```powershell # ----- PARAMETERS SECTION ----- $briefConnectServerSPObjectId = "" $servicePrincipalObjectId = "" # ----- END PARAMETERS SECTION -----
$webApiFullControlAppRoleId = az ad sp show --id $briefConnectServerSPObjectId --query "appRoles[?value=='WebApi.FullControl'].id" -o tsv
az rest --method "POST" --headers "Content-type=application/json"--url "https://graph.microsoft.com/v1.0/servicePrincipals/$($servicePrincipalObjectId)/appRoleAssignments"
--body "{'principalId': '$($servicePrincipalObjectId)', 'resourceId': '$($briefConnectServerSPObjectId)', 'appRoleId': '$($webApiFullControlAppRoleId)'}"
```
- Go to Azure Portal - Cloud shell, paste the script and execute it.
- Validate permissions and grant admin consent if required
- Go to Azure Portal - Microsoft Entra ID - Enterprise applications
- Find Logic App service principal (use Object ID) and open it
- Go to Security - Permissions page, and validate that WebApi.FullControl permission is available there. If not, click on 'Grant admin consent for...' button.

6 Mail.Send Application role assignment in Exchange
This instruction will guide you through the steps for setting up granular Mail.Send application permissions using Role Based Access Control (RBAC) for Logic App Managed Identity in Exchange Online.
Note: No Graph API Mail.xxxxx permissions required for Service Principal. This implementation is using app permissions RBAC in Exchange.
Pre-requisites
- Exchange Admin account
- UPN of the Brief Connect service account that is used to send email notification
- PowerShell 7 installed
- Exchange Online PowerShell module installed
Steps to execute
Important: All following steps should be executed in PowerShell console, in the same session one after another.
- Login with Exchange Administrator account. Run next PowerShell script and follow the instructions in the console:
```powershell # Import the Exchange Online Management module to gain access to the required cmdlets. Import-Module ExchangeOnlineManagement
# Establish a connection to Exchange Online. Connect-ExchangeOnline -Device ```
- Create a new Managed Scope for Email Service Account. Replace next tokens in the script below, and execute it:
: replace it with the UserPrincipalName of the Email Service Account. The example result value of RecipientRestrictionFilter parameter with UPN: "UserPrincipalName -eq 'brief-connect-dev-email-sender@contoso.com.au'": replace it with the name for a new Managed Scope, according to your naming policies. We recommend to base name on RecipientRestrictionFilter parameter value. For example for the filter example above, the name can be: "Brief Connect Dev Mailbox Managed Scope".
powershell
   # Create a new management scope with the specified name and recipient restriction filter.
    New-ManagementScope -Name "<Managed Scope Name>" -RecipientRestrictionFilter "UserPrincipalName -eq '<Email Service Account UPN>'"
Managed Scopes are unique by RecipientRestrictionFilter property value. You can't create multiple scopes with the same filter but with different names. If you already have a management scope with RecipientRestrictionFilter for the given Email Service Account, then you should skip the creation step and use existing Managed Scope in the following steps.
- Next script will create Service Principal for Logic App Managed Identity and Application Role Assignment with Application Mail.Send permission.
Update parameters in the header, and execute the script:
- managementScopeName: The name for the Managed Scope from the previous steps.
- managementRoleAssignmentName: The name of a new Application Role Assignment, according to company's naming policies. Example value: "Brief Connect DEV Logic App Send Emails Role Assignment".
- servicePrincipalAppId: AppId (application ID) of the logic app managed identity service principal (from Azure Portal - Microsoft Entra ID - Enterprise applications)
- servicePrincipalObjectId: ObjectId of the logic app managed identity service principal (from Azure Portal - Microsoft Entra ID - Enterprise applications)
```powershell # ----- PARAMETERS SECTION ----- $managementScopeName = "" $managementRoleAssignmentName = "" $servicePrincipalAppId = "" $servicePrincipalObjectId = "" # ----- END PARAMETERS SECTION -----
# Do not change it. All supported roles: https://learn.microsoft.com/en-us/exchange/permissions-exo/application-rbac#supported-application-roles $appRoleName = "Application Mail.Send"
# Create a new service principal for the provided AppId and ObjectId. New-ServicePrincipal -AppId $servicePrincipalAppId -ObjectId $servicePrincipalObjectId
# Create a new management role assignment. # Assign the specified role to the service principal within the custom resource scope. New-ManagementRoleAssignment -Name $managementRoleAssignmentName -Role $appRoleName -App $servicePrincipalAppId -CustomResourceScope $managementScopeName
# Test Service principal authorization Test-ServicePrincipalAuthorization -Identity $servicePrincipalObjectId
```
- Disconnect Exchange Online session. Run the command below:
powershell
   # Disconnect from Exchange Online without prompting for confirmation.
   Disconnect-ExchangeOnline -Confirm:$false
7. Logic App Workflow deployment
Workflow deployment
Package to deploy: LogicApp
- Open the folder labelled with the workflow you want to deploy (eg. RecordAssigneeNotifier)
- Open the workflow.json file in VS Code or editor of choice, and copy the JSON.
- Open the Logic App resource in Azure Portal.
- In the left-hand menu, click Workflows
- Click Add, name the new workflow "RecordAssigneeNotifier".
- Select Stateful, then click Create.
- When the new workflow is created, open it and switch to the Code view.
- Paste in the JSON from the workflow.json file.
Add Application Settings
- Open the Logic App resource in Azure Portal
- Go to Workflows -> Open any workflow -> Parameters
- Add the following parameters:
| Parameter | Example Value | Type | Description |
|---|---|---|---|
authAudienceString |
<client-id> |
String | The Azure App Registration Client Id for the Brief Connect Server app registration |
briefConnectDoEDEVHomeString |
https://briefconnect.com/#/ |
String | The homepage URL of Brief Connect, be sure to include the /#/ that is present in the URL |
serviceAccountEmailString |
serviceaccount@briefconnect.com |
String | The service account UPN used to send emails for the notifications |
webApiBaseURLString |
https://briefconnectapilink.net/ |
String | Base URL used for making API calls to the Brief Connect API, with trailing / at the end. |
8. Add OnRecordCreated Webhook
After deployment, register a webhook in Brief Connect so new records trigger the Logic App.
- Copy the Logic App trigger URL:
- Azure Portal → Logic App → Workflows →
RecordAssigneeNotifier→ Trigger → “Show callback URL”
- Azure Portal → Logic App → Workflows →
- Create the webhook in the Azure Table via Azure Portal:
- Azure Portal → Resource Group → Storage Account → Storage Broswer → Tables → WebhookSubscription
-
Add a webhook entity to the table with the following details
- PartitionKey: 1
- RowKey: '
RecordAssigneeNotifierWebhook' - Endpoint: Paste
RecordAssigneeNotifiertrigger callback URL - Order: 1
-
Create a test record → confirm a new run appears under Runs history in Logic App.
PLEASE NOTE: If the name of the workflow's trigger is EVER updated, the webhook must be removed and recreated using the trigger's new callback URL.
9 Update API web app settings
- Open Brief Connect API Web Application web app
- Go to Settings - Environment variables
- Update/create next variables.
| Environment Variable Name | Value |
|---|---|
| AppName | Same value as in Brief Connect Function App |
| AppUrl | Same value as in Brief Connect Function App |
| AuthorizedGroupId | Same value as in Brief Connect Function App |
| ClientCertificate | Same value as in Brief Connect Function App |
| ClientId | Same value as in Brief Connect Function App |
| CosmosDbConnectionString | Same value as in Brief Connect Function App |
| RedisCacheConnectionString | Same value as in Brief Connect Function App |
| StorageAccountConnectionString | Same value as in Brief Connect Function App |
| SiteUrl | Same value as in Brief Connect Function App |
| TenantId | Same value as in Brief Connect Function App |
| SupportedTenantIds | Same value as in Brief Connect Function App |
| EntraIDAuthorization__Audience | App ID (Application id) obtained from Azure Portal - Microsoft Entra ID - App registrations for Brief Connect Server Application |
| EntraIDAuthorization__ClientId | App ID (Application id) obtained from Azure Portal - Microsoft Entra ID - App registrations for Brief Connect Server Application |
| EntraIDAuthorization__Instance | https://login.microsoftonline.com/ |
| EntraIDAuthorization__Role | WebApi.FullControl |
| EntraIDAuthorization__TenantId | EntraID tenant ID |
10. Workflow Testing
To validate the Logic App deployment and configuration, follow these steps using the actual Brief Connect application and Azure Portal:
- Create a Record in Brief Connect
- Use the Brief Connect web application to create a new record or trigger the workflow event (e.g., record creation, status change) that should initiate a notification.
- Ensure the event matches the workflow trigger configured in the Logic App (e.g., OnRecordCreated webhook).
- Confirm Logic App Run in Azure Portal
- Go to the Azure Portal → Resource Group → Logic App (Standard) → Runs history.
- Locate the recent run corresponding to your test event.
- Check that the run started and completed successfully.
- Review the run details to confirm that all workflow actions executed as expected (e.g., API calls, data processing, notification logic).
- Verify Notification Delivery
- If the workflow sends emails, check the recipient’s mailbox for the notification message.
- If the workflow posts to another system (e.g., updates a record, calls an API), verify the outcome in the target system.
- For troubleshooting, review the Logic App run details for any failed actions or error messages.
- End-to-End Confirmation
- The test is successful if:
- The record/event in Brief Connect triggers the Logic App.
- The Logic App run completes without errors.
- The intended notification (email or other action) is delivered to the correct recipient(s) or system.
Tip: If you encounter issues (e.g., no run appears, notification not sent), use the Logic App run history and troubleshooting section to diagnose and resolve configuration or permission problems.
11. Troubleshooting (optional)
| Symptom | Cause | Solution |
|---|---|---|
| No run appears | Outdated trigger URL | Copy new callback URL from portal |
| 401 / 403 Unauthorized | Role not assigned or wrong audience | Check API permissions and audience |
| “Setting not found” | Missing app setting | Add to Configuration and restart |
| Emails not sending | Exchange RBAC misconfigured | Re-run Exchange script / check mailbox scope |
| API calls fail | Invalid API_BASE_URL or token audience |
Correct App Setting or App ID URI |
| Webhook not triggering | Webhook inactive in Brief Connect | Re-register or enable webhook |